How to create your own run command.

Today I am going to share an Awesome and Easy trick to Create your own run command for any application.

How to create your own run command for any application. 


You can access cmd simply by pressing WIN + R. This RUN command makes easier to access applications with a small command names and no need to search for application in application list.

Create your Own RUN Command in Windows Many commands are in built along with windows operating system. For example commands like  "notepad" for Notepad application and "regedit" for registry editor and there are many more(For more click here)

Other than inbuilt commands we can also create our own run commands easily for any application or for any folder to access them easily.

How to Create your Own RUN Command.


Step 1: Select the software for which you want to make custom Run command. For example, let us consider Mozilla Firefox. You may use any application or software other than which is already there in Run command.

Step 2: In next step Right click on the desktop and make a new Shortcut.

Step 3: As you select the Shortcut, it will open up a dialog box asking the path of the application or software for which you want to create


Step 4: Now you need to provide the path of the application's .exe file i.e. "firefox.exe". It can be found out in the C drive under Program files.

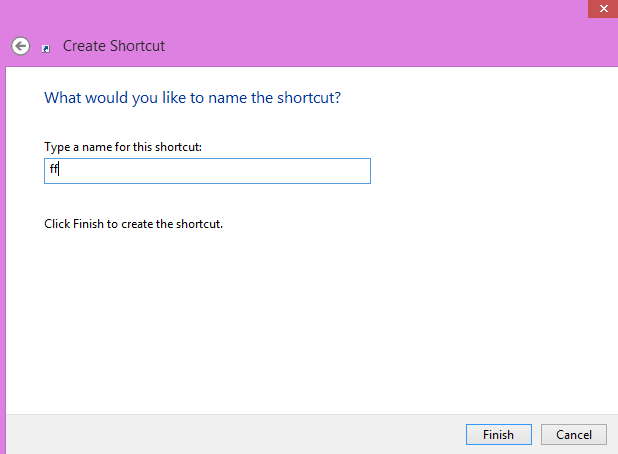
Step 5: After that just provide a relative name for the Shortcut that means rename it with the name which will be used as your Run command. For example, "ff" for Firefox.


Step 6: Now click on Finish button. Then the shortcut of respective application will be created on your desktop screen.

Step 7: In the next step just cut and paste the created Shortcut into the root drive i.e. C:/Windows/. For this make sure you are the administrator of the computer.

Step 8: Now, you are done with the process of creating the Run command and you can Open Run Command and type "ff" to open Mozilla Firefox application.


Similarly you can perform above steps to Create Run Command for various other Programs too.And If u have any problem related to any of my posts U can comment below.

And If you want me to write a Particular article of your choice then you can Contact me anytime with the topic and i will try to publish it here on this blog soon..And dont forget to Follow us on Facebook , Twitter and G+ to get updates.

Important Run commands.

Important run commands.


The top ten most used run commands are listed below:
>>Press Windows key + R to open run window.
Also Read:How to use your smartphone as webcam.

ipconfig – Quickly Find Your IP Address

You can find your IP address from the Control Panel, but this takes quite a few clicks. The ipconfig command is a fast way of determining your computer’s IP address and other information, such as the address of its default gateway — useful if you want to know the IP address of your router’s web interface.

To use the command, just type ipconfig into a Command Prompt window. You’ll see a list of all the network connections your computer is using. Look under Wireless LAN adapter if you’re connected to Wi-Fi or Ethernet adapter Local Area Connection if you’re connected to a wired network.

Flushdns – Flush Your DNS Resolver Cache

If you change your DNS server, the effects won’t necessarily take place immediately. Windows uses a cache that remembers DNS responses it’s received, saving time when you access the same addresses again in the future.

To ensure Windows is getting addresses from the new DNS servers instead of using old, cached entries, run the ipconfig /flushdns command after changing your DNS server.


ping, tracert – Troubleshoot Network Connection Issues

If you’re experiencing issues connecting to a website or other network connection issues, Windows and other operating systems have some standard tools you can use to identify problems.

First, there’s the ping command. Type ping google.com and Windows will send packets to Google.com. Google will respond and let you know it’s received them. You’ll be able to see if any packets didn’t make it to Google.com — perhaps you’re experiencing packet loss — and how long it took you to hear back — perhaps the network is saturated and packets are taking a while to reach their destinations.


There’s also the tracert command, which traces the route it takes for a packet to reach a destination. For example, run tracert google.com and you’ll see the path your packet takes to reach Google. If you’re having issues connecting to a website, tracert can show you where the problem is occurring.
                                     

shutdown – Create Shutdown Shortcuts on Windows 8

The shutdown command is particularly useful on Windows 8. You can use it to create your own shortcuts and place them on your Start screen or desktop, allowing you to more easily shut down Windows without digging through the charms bar or logging out first.

This command can also be used to restart your computer. On Windows 8, you can even use a special switch to restart your computer into the advanced startup options menu.

Shut Down: shutdown /s /t 0
Restart: shutdown /r /t 0
Restart Into Startup Options: shutdown /r /o
create-shut-down-shortcut-on-windows-8
                                      

recimg – Create Custom Recovery Images

The Refresh Your PC feature on Windows 8 allows you to restore your computer’s system state to its original state — either from a clean Windows install or as the computer came from its manufacturer. You can create your own custom recovery images, but this feature is hidden — you have to do it with the recimg command from a command line. This allows you to remove manufacturer-installed bloatware or add your favorite desktop programs to your recovery image.


sfc /scannow – Scan System Files for Problems

Windows includes a system file checker tool that scans its system files and looks for problems. If system files are missing or corrupted, the system file checker will repair them. This may fix problems with some Windows systems.

To use this tool, open a Command Prompt window as Administrator and run the sfc /scannow command.


telnet – Connect to Telnet Servers

The telnet client isn’t installed by default. You’ll have to install it from the Control Panel. Once installed, you can use the telnet command to connect to telnet servers without installing any third-party software.

You should avoid using telnet if you can help it, but if you’re connected directly to a device and it requires that you use telnet to set something up — well, that’s what you have to do.


cipher – Permanently Delete and Overwrite a Directory

The cipher command is mostly used for managing encryption, but it also has an option that will write garbage data to a drive, clearing its free space and ensuring no deleted file can be recovered. Deleted files normally stick around on disk unless you’re using a solid state drive. The cipher command effectively allows you to “wipe” a drive without installing any third-party tools.

To use the command, specify the drive you want to wipe like so:

ciper /w:C:\


netstat -an – List Network Connections and Ports

The netstat command is particularly useful, displaying all sorts of network statistics when used with its various options. One of the most interesting variants of netstat is netstat -an, which will display a list of all open network connections on their computer, along with the port they’re using and the foreign IP address they’re connected to.

This isn’t a comprehensive list of all the commands you might find useful, but we hope it’s given you some idea of the many powerful tools lurking under the surface. Linux isn’t the only operating system where users can benefit from learning some commands.


If you have any queries related to any of our post, you can comment below or contact us here.
For more, follow us on Facebook , Twitter and G+.
Keep visiting Hackersfall.

How to use your Smartphone as a webcam.

If you do not own a Web Cam, then you can now easily use your smartphone as Web Camera. If your Smartphone have good Camera quality then its even better.

Use Android Smartphone as Web Cam.


We will Be using an APP to perform this trick. Other things you need is a USB cable to Connect your Smartphone to PC.

Steps to use Android Smartphones as Web Camera:


Step 1: Download and Install DroidCam app on your Android Smartphone.

Step 2: Now Download DroidCam Windows Client and install it on your PC.

 Install it as just you install other Softwares. it will automatically Install all the required Drivers.
Also read:How to make your computer welcomes you.

Step 3: Once you have Downloaded and installed DroidCam on your Smartphone and PC, its time to connect your Smartphone to PC using USB Cable, Make sure to enable USB Debugging on your Smartphone.

Step 4: Once your smartphone is connected to your PC, Its Time to open DroidCam app on your Smartphone and the Windows Client on your PC. Click on USB icon and then Click "START"

Step 5: Thats it, now you will see the Magic On your Screen. Enjoy!!
Also check out:How to hide your hard disk drives.

If you have any Trouble then Feel free to Comment below in Comment box.
For more, follow us on Facebook , Twitter and G+.
Keep visiting Hackersfall.


how to Make your computer welcomes you.

Have you ever noticed the computers in movies welcome their users by their names or any special name like in MISSION IMPOOSIBLE:GHOST PROTOCOL and Jarvis in IRONMAN. 

In this article I will show you how you can make your windows welcomes you. 

Just follow these easy steps below to get surprised::-
Step1: Open Notepad.
Right Click > New > Text Document
Step2: Now copy the below code in Notepad and change the highlighted word with your own message.
Dim speaks, speech speaks="Hello THERE, Welcome" Set speech=CreateObject("sapi.spvoice") speech.Speak speaks NOTE: Also U can change at the place of (Hello THERE, Welcome) to anything you want. his is what your PC will speak.

See more:How to Disable/enable cmd in windows.

Step3: Save the file as Welcome.vbs . 
In Notepad, Click on File > Save As > Welcome.vbs 
Double click on this file to see its working. You will hear what you have typed when you double click this file. 
Now Copy/Cut the file and Paste in Start-up folder. 
Now next time when you Start your PC you will feel the difference. If you need any help then you can comment below. 

To Find the startup folder just follow the steps given below::-
"Startup Folder contains all the programes that starts with system boot. If you paste any File or Shortcut of a file in this folder it will automatically start with system boot. "

How to use your pendrive as RAM in windows 

For Windows XP: 

Locate to the startup folder using the path given Below:
C:\Documents and Settings\All users\Start Menu\Programs\Startup
From this folder you can easily manage your autostart programs manually.

For Windows Vista, 7, 8 & 8.1:
Now find startup folder using the path given below:
C:\Users\User-Name\AppData\Roaming\Microsoft\Windows\Start Menu\Programs\Startup

OR
Open run and type "%appdata%" (without quotes) and hit enter. and then follow the path after roaming command above. 

NOTE: The folder AppData is hidden actually, So it is important to unhide all the Folders first. 
Now you can manage your startup programs manually. 

If you need any help related to this trick then just Comment below ,I will help you solving your problem. And, If you like this then Share it with your friends. 
For more, follow us on Facebook , Twitter and G+.

Keylogger, its working and how to be safe from keyloggers.

What is Keylogger, How it works & how to be safe from Keyloggers.?


What are keyloggers?


Keylogger is a tiny hardware device or a software program that records real time Activity of a computer including keystrokes, Clicking module and in some cases stores the screen Activity of your desktop.


Types of Keyloggers:

Most sources defines keyloggers as software programs, it is not necessary for keyloggers to be software every time, it can be hardware devices some times.
Primarily Keyloggers can be divided into two types,


1. Software keyloggers
2. Hardware keyloggers
Also read: How to enable/disable command prompt in windows

How it works:
Once a keylogger is installed into the system. it starts sending Information such as keystroke, Activities details of clicks made, And some time ip details & Screenshots of Desktop of the Victim.
Most of the time it is not easy to trace a keylogger running in the background, but it can be checked in the task manager.

Are Keyloggers Harmful? what are its uses:

Most of the people thinks keyoggers are only meant for hacking. well it's not completely true. and yes it is harmful if used for wrong Activities. Most of the software keyloggers are  detected as harmful malware as trojan by Antivirus programs.
Keyloggers can be used to remotely spy over a computer or network, without being noticed. and is oftenly used by Cyber crimnals to hack Email, Bank Account and Social Network accounts.
In addition to these keyloggers are used for various other purposes. Including in Company security, to check what employs do in their office, and to record, analyze & track the Incidents linked to a computer or network. Keyloggers are also used sometimes for Parental control, and Industries to keep a look over the targeted system so that it could be controlled remotely.

Where to download & how to use it: 

There are lots of legitimate Keylogger programs available to download free of cost, and some are Available for small Amount of money with additional Features.
Most of the modern keyloggers available are free to download, and can be downloaded from various software providing websites.
After downloading or buying the license of a typical Keylogger program, it is to easy to use it, most of keyloggers are made to generate installation module which is then send to the victim via email, or any other source. since most of the times, Antivirus Programs detect it as trojan and removes it, it is better to compress it into zipped file. as soon as the Module is run by the victim, the program starts working in the background without being noticed.
Attacker can then spy over the victim by logging into the account created by him on the server of the software or sometimes is being noticed directly into his mail.

How to Remove keylogger:

If you are already being a victim by someone who is spying you through keylogger program, and you don't know how to remove it. then you need to run task manager and check for unwanted program
which are running in the background. If you still don't know how to do it. there are many softwares available online to remove keyloggers.

Its better to keep your Antivirus program updated, as most of the Keylogger are automatically detected and removed. In addition to these users should be more careful with compressed (zipped, rar files) from untrusted source. and while using Online banking don't forget to switch to Virtual Keyboard.

Also check:How to use your pendrive as RAM.

If you have any queries related to any of our post, you can comment below or contact us here.
For more, follow us on Facebook , Twitter and G+.
Keep visiting Hackersfall.

How to Disable/Enable CMD in Windows.


Just follow these easy steps::-
Step:1 Open Run. (Press Win Logo Key + R.)

Step:2 Type gpedit.msc and hit Enter to open Group Policy Editor.

(NOTE: You should be the administrator of PC to open GP Editor.)

Also read:To use your pendrive as RAM.

Step:3 In Group Policy window browse to the following path in Left Pane.

User Configuration > Administrative Templates

Step 4: In right pane, Double click on 'System' Folder and then Open 'Prevent Access to the Command Prompt'.

Step:5 You will see a new Dialog box. In this box change the setting to Enable and Click OK.

Now your Command Prompt has been disabled.

To re-enable it locate back to settings (in step 5) and choose Disable.
Note:This trick doesnt work in windows 8,8.1.

Also read:To use your pendrive as RAM.

If you have any queries related to any of our post, you can comment below or contact us here.
For more, follow us on Facebook , Twitter and G+.
Keep visiting Hackersfall.

How to use your pendrive as RAM.

How to Use Pendrive as RAM in Windows

In this Technological World, almost Every Student and Computer user own a Pendrive. Some may own Couple of them. Pendrive is Used to Store your personal Data or to transfer files between one computer to another, but do you know that you can Use Pendrive as RAM and Boost your PC performance? 
You might be now Anxious to know How to use Pendrive as RAM Right? You must be Because RAM plays an important part for your PC performance. With the Introduction of Readyboost Feature in Windows, it has become easier to Boost your PC and speed it up.

How to use Pendrive as RAM with Readyboost
To use your Pendrive as RAM, You have to make Sure that you have a Pendrive which have a Free Storage Capacity of 4GB.
A pendrive with 8gb capacity is Highly Recommended to perform this Task.

Step 1: Insert your 4GB or 8GB Pendrive.
Step 2: Format your pendrive before moving forward. 

Must Read:To hide your hard disk drives

Step 3: Now goto My Computers and Right Click on your Pendrive to Select Properties.
Step 4: Click on Readyboost Tab, Now wait couple of seconds so that it analyzes your Pendrive, Next you will see something like below Picture .
Step 5: Click on Use this Device , Select the number of MBs you want to use out of total space, Then Click on Apply 
Step 6: Next you will see Readyboost is Configuring your Cache, When its Done, Just reboot your PC to Feel the Difference

TIP: Once you Start using ReadyBoost Feature, you will have to Practice to Remove your Pendrive Safely Before Ejecting it to Avoid any trouble. This was a Very simple and Effective Step by Step Guide on How to Use Pendrive as RAM in Windows PC. I hope this article will help you so pls Share it on Social Media to Help us Grow. Don't Forget to Read more Interesting and Helpful articles on my Blog. 
How to Use Pendrive as RAM in Windows

In this Technological World, almost Every Student and Computer user own a Pendrive. Some may own Couple of them. Pendrive is Used to Store your personal Data or to transfer files between one computer to another, but do you know that you can Use Pendrive as RAM and Boost your PC performance?
You might be now Anxious to know How to use Pendrive as RAM Right? You must be Because RAM plays an important part for your PC performance. With the Introduction of Readyboost Feature in Windows, it has become easier to Boost your PC and speed it up.

How to use Pendrive as RAM with Readyboost
To use your Pendrive as RAM, You have to make Sure that you have a Pendrive which have a Free Storage Capacity of 4GB.
A pendrive with 8gb capacity is Highly Recommended to perform this Task.

Step 1: Insert your 4GB or 8GB Pendrive.
Step 2: Format your pendrive before moving forward.

Must Read:To hide your hard disk drives

Step 3: Now goto My Computers and Right Click on your Pendrive to Select Properties.
Step 4: Click on Readyboost Tab, Now wait couple of seconds so that it analyzes your Pendrive, Next you will see something like below Picture .
Step 5: Click on Use this Device , Select the number of MBs you want to use out of total space, Then Click on Apply
Step 6: Next you will see Readyboost is Configuring your Cache, When its Done, Just reboot your PC to Feel the Difference

TIP: Once you Start using ReadyBoost Feature, you will have to Practice to Remove your Pendrive Safely Before Ejecting it to Avoid any trouble. This was a Very simple and Effective Step by Step Guide on How to Use Pendrive as RAM in Windows PC. I hope this article will help you so pls Share it on Social Media to Help us Grow. Don't Forget to Read more Interesting and Helpful articles on my Blog.

Also check::Make folder invisible without hiding

To Hide Your Hard Disk Drives


How To Hide Your Hard Disk Drives

Just follow these easy steps. Step 1:- First type gpedit.msc on run and press enter.
Step 2:- Go to second option in User Configuration and expand "AdministrativeTemplates".....then Expand "Windows Components".....then Click On "Windows Explorer".
Step 3:- After Clicking on Windows Explorer go to right hand side there is an option "Hide These Specified drives in My Computer".
Step 4:- Open It and Select Enable by default it is in not configured Mode.
Step 5:- Choose Which Drive You want to hide under "Pick one of the following combinations"....If you want to hide all just choose "Restrict all drives"....Then click Apply then Ok.
--> After Ok And apply ,your Selected hard drives in my computer will be hidden.
To Show Your Hidden Drives:-

Follow the above 3 Steps and change the dropdown drive select to "Do not restrict Drives" then apply and check the "not configure" click Ok and 

See more tricks

Make folder invisible without hiding it.

Also dont forget to LIKE and SHARE. This will help us to improve our connections.


If you have any queries related to any of our post, you can comment below or contact us here.
For more follow us on Facebook , Twitter and G+.
Keep visiting Hackersfall.
How To Hide Your Hard Disk Drives

Just follow these easy steps. Step 1:- First type gpedit.msc on run and press enter.
Step 2:- Go to second option in User Configuration and expand "AdministrativeTemplates".....then Expand "Windows Components".....then Click On "Windows Explorer".
Step 3:- After Clicking on Windows Explorer go to right hand side there is an option "Hide These Specified drives in My Computer".
Step 4:- Open It and Select Enable by default it is in not configured Mode.
Step 5:- Choose Which Drive You want to hide under "Pick one of the following combinations"....If you want to hide all just choose "Restrict all drives"....Then click Apply then Ok.
--> After Ok And apply ,your Selected hard drives in my computer will be hidden.
To Show Your Hidden Drives:-

Follow the above 3 Steps and change the dropdown drive select to "Do not restrict Drives" then apply and check the "not configure" click Ok and !
See more tricks:Make folder invisible without hiding it.
Call anyone by any number.
If u need any kind of help related to this trick then you can comment below . Also dont forget to LIKE and SHARE. This will help us to improve our connections.

Make the folder INVISIBLE without hiding


Make the folder INVISIBLE without hiding.
make the folder invicible.. :p
  1. First make a new folder.
  2. Now rename the folder with a space ( hold alt key and type 0160).
  3. Now u have a folder without a name.
  4. Now right click on the folder-properties-customize. Click on change icon.
  5. Scroll a bit , u should find some empty spaces, click on any one of them.
    Click ok
Thats it.
Now u can store ur personal data without any software.
For more tricks: HackersFall

How to add image in mp3 file.

Adding image in mp3 file is very simple.

You can add image in mp3 file by following these easy steps::-

Step1: First download the software MP3 tag and install it.
Step2: Then after opening the software , select the directory where your mp3 file is located.
Step3: Now choose the song in which u wanna add that image.(Also u can select multiple songs at a  time)
Step4: Now click on the cover section and then click on add cover and select your image.
Step5: Click on save.

Thats all.

If you have any queries related to any of our post, you can comment below or contact us here.
For more tips and tricks , News and more, follow us on Facebook , Twitter and G+.
Keep visiting Hackersfall.


Call anyone by any number.

Note:
For education purposes only
  1. Open http://www.crazycall.net/
  2. Select your country and wait for the page to load.
  3. Enter number you wanna displaying the the first box.(Dont change the contents of small box if the fake no is of same country)
  4. Enter the number you wish to call in the second box.
  5. Choose voice pitch as normal(for same voice) or high to low pitch to change your voice.
  6. click on get me a code
  7. Dial the no shown on the right and enter the shown code when asked.
Thats it , Remember International call rates apply.. :D

If you have any queries related to any of our post, you can comment below or contact us here.
For more, follow us on Facebook , Twitter and G+.
Keep visiting Hackersfall.
Call Anyone by any number..!!!!
For education purposes only
  1. Open http://www.crazycall.net
  2. Select your country and wait for the page to load.
  3. Enter number you wanna displaying the the first box.(Dont change the contents of small box if the fake no is of same country)
  4. Enter the no u wish to call in the second box.
  5. Choose voice pitch as normal(for same voice) or high to low pitch to change your voice.
  6. click on get me a code
  7. Dial the no shown on the right and enter the shown code when asked.
Thats it , Remember International call rates apply.. :D
See more:How to remove shortcut viruses.

How to remove shortcut viruses From USB

Whenever we plug in a USB drive , there might be chances that there are shortcut viruses in that drive , then we need to remove that viruses . In this post I will show you how to remove these shortcut viruses from any drive.


Just follow these easy steps::-

1) Open command prompt by typing 'cmd' in run and press enter.

2) Open the drive from where u wanna remove the shortcuts by writing the drive name as " I: " and hit enter .(My drive name is "I" , yours may be different )

3) Then type or u can copy this command in cmd  attrib -h -r -s /s /d I:\*.*   and press enter .

4) You will see a message of access denied something but dont worry the shortcuts are removed.

Thats all , You are done, all shortcut viruses havr been removed.

For more posts follow us on Facebook , Twitter and G+.

You can comment below if you have any problem or contact us on contact us page.

Lock Unlock Pc using USB without any software.

Hey guys,,!! Today morning i was shocked when i saw my brother using MY laptop . I was afraid that he could access all my personal data so to prevent this mishappening again i google something out and found an awsm trick to lock/unlock ur pc using USB without any software....!!!!

Lock Unlock PC using USB without any software.

Now it is possible to lock or unlock ur pc with just a pendrive . To do this u just need to follow these easy steps.

1) Insert your device.
2)Start cmd and type diskmgmt and hit enter.
3)Right click on your device and select "CHANGE DRIVE LETTER" and rename it with "A".
4) Start cmd and type syskey and hit enter.
5) Click update and choose "STONE STARTUP KEY ON FLOPPY DISK " and click OK.


That's it you have just secured your pc. To test just restart your system.

To remove this feature just start cmd and enter syskey and choose to store it locally.

But i dont think you wanna remove this feature.


If you have any queries related to any of our post, you can comment below or contact us here.
For more, follow us on Facebook , Twitter and G+.
Keep visiting Hackersfall.

How to make a virus that will open unlimited notepads.

To make a virus that will open unlimited notepads just follow the steps given below.

Paste the given code in notepad.

@echo off
:top
start %systemroot%\system32\notepad.exe
goto top

Just paste this in a notepad and save that file as Anything.bat and double click it. whooop.
You are all done.

You can also change the execution file (here is notepad). like instead of notepad u can put paint or calc etc.

If you have any queries related to any of our post, you can comment below or contact us here.
For more, follow us on Facebook , Twitter and G+.
Keep visiting Hackersfall.

Make a password protected folder without any software.

Password protected folder without any third party tool.

To make a folder password protected you just need to follow these simple steps.

- Copy this given code in a notepad and save it with a .bat extension .
- Now will find a folder with this file.
- Copy all your data in that folder and lock that folder by opening this .bat extension file.


cls
@ECHO OFF
title Hackersfall
if EXIST "Control Panel.{21EC2020-3AEA-1069-A2DD-08002B30309D}" goto UNLOCK
if NOT EXIST MyFolder goto MDMyFolder
:CONFIRM
echo Are you sure to lock this folder? (Y/N)
set/p "cho=>"
if %cho%==Y goto LOCK
if %cho%==y goto LOCK
if %cho%==n goto END
if %cho%==N goto END
echo Invalid choice.
goto CONFIRM
:LOCK
ren MyFolder "Control Panel.{21EC2020-3AEA-1069-A2DD-08002B30309D}"
attrib +h +s "Control Panel.{21EC2020-3AEA-1069-A2DD-08002B30309D}"
echo Folder locked
goto End
:UNLOCK
echo Enter password to Unlock Your Secure Folder
set/p "pass=>"
if NOT %pass%== YOURPASSWORD goto FAIL
attrib -h -s "Control Panel.{21EC2020-3AEA-1069-A2DD-08002B30309D}"
ren "Control Panel.{21EC2020-3AEA-1069-A2DD-08002B30309D}" MyFolder
echo Folder Unlocked successfully
goto End
:FAIL
echo Invalid password
goto end
:MDMyFolder
md MyFolder
echo MyFolder created successfully
goto End
:End


You are all done. Enjoy.

**Note : here your password is YOURPASSWORD. You can change your password by editing the file.

If you have any queries related to any of our post, you can comment below or contact us here.
For more, follow us on Facebook , Twitter and G+.
Keep visiting Hackersfall.
Powered by Blogger.

Follow Us On Twitter

Contact Form

Name

Email *

Message *


© 2013 HackersFall. All rights resevered. Designed by Templateism

Back To Top