Showing posts with label blogger. Show all posts

How To Edit And Customize Blogger Mobile Templates

If you enable mobile template for your blog, here is a good news, you can now customize your mobile site to your own personal taste using CSS definitions. You will able to decide which widget is to be displayed in mobile site and which one shouldn't. You can also configure a widget to appear on both desktop and mobile site.


How To Customize Mobile Template
The default widget that appears on mobile template are as follow:
  • Header
  • Blog
  • Page List
  • Adsense (If applied)
  • Profile
  • Attribution
Three properties can be use to control how widget operates, and the properties include:mobile="no", mobile="yes", and mobile="only".
If you want to hide any default widget, simply use the mobile="no" property to hide the widget in mobile website.

Example: The default widget tag/code for attribution widget is:

<b:widget id='Attribution1' locked='true' title='' type='Attribution'/>

Now to hide the attribution widget, simply insert the mobile="no" property as shown below
<b:widget id='Attribution1' locked='true' mobile='no' title='' type='Attribution'/>
If you want to show any non-default widget, simply use the mobile="yes"property.

Example: The default widget code for the archive widget is:
<b:widget id='BlogArchive1' title='Blog Archive' type='BlogArchive'>
Now use the mobile="yes" property as shown below
<b:widget id='BlogArchive1' title='Blog Archive'mobile='yes'type='BlogArchive'>
If you want to show a widget only in mobile site, simply use the mobile="only"property.

Example: Let's try to show the archive widget only in mobile site, using the mobile="only" property as shown below.
<b:widget id='BlogArchive1' title='Blog Archive' mobile='only' type='BlogArchive'>
What Next?

You will need to activate custom template for your mobile template, as it may not show any changes if you are the using any of the default template.

Now go to Template, click on the gear icon below the mobile template and set it as shown in the screenshot below.
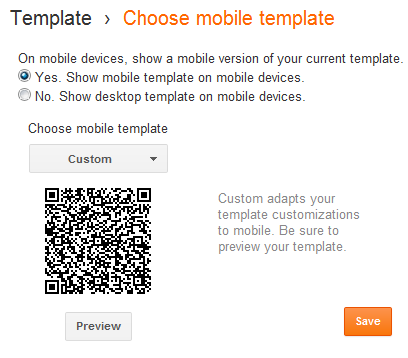
It is advisable that you Preview the custom template before you finally click on the
Save button.

For more news, follow us on Facebook , Twitter and G+.

How to add Twitter Follow button to your Blog.

Recently I was just going through my website to check if there is anything missing, then I noticed I did not have an easy way for people to follow me us twitter. Also I did not have a widget even, so I decided to place a Twitter Follower button and a Tweet's widget.

Here is the screenshot of the "follow button" widget on my blog.


I searched for how to add "Twitter follow button " and found that this was very easy to do.

You can find more about Twitter widgets on Developers page.
The Follow button is a small widget which allow user to follow a twitter account from any page.
Below is the code you can use to show different follow buttons.


To add Twitter follow button to your blog , just follow the given steps :

  • Go to blogger Dashboard then go to Template and click on Edit HTML.
  • Just paste these given codes anywhere in your coding where your wanna display the Follow button. 
FOLLOW BUTTON WITH COUNT : 
<a href="https://twitter.com/Hackersfall"
class="twitter-follow-button"
data-show-count="true"
data-size="large">Follow @Hackersfall</a>
<script>!function(d,s,id)
{
var js,fjs=d.getElementsByTagName(s)[0];if(!d.getElementById(id))
{
js=d.createElement(s);js.id=id;js.src="//platform.twitter.com/widgets.js";
fjs.parentNode.insertBefore(js,fjs);
}
}
(document,"script","twitter-wjs");
</script>


If you dont want to Display follow Counts then just change
data-show-count="true"...... to .....data-show-count="false"

<a href="https://twitter.com/Hackersfall"
class="twitter-follow-button"
data-show-count="false"
data-size="large">Follow @Hackersfall</a>
<script>
!function(d,s,id)
{
var js,fjs=d.getElementsByTagName(s)[0];
if(!d.getElementById(id))
{
js=d.createElement(s);
js.id=id;js.src="//platform.twitter.com/widgets.js";
fjs.parentNode.insertBefore(js,fjs);
}
}
(document,"script","twitter-wjs");
</script>

Configure your Follow Button : 
Just change Hackersfall to your Twitter username.

There are some properties which allow you to configure the Follow Button and display. Use data-attributes for the Javascript version:

Followers count display : data-show-count
Language : data-lang
Width : data-width
Alignment : data-align
Size : data-size
If you have any queries related to any of our post, you can comment below or contact us here.

For more tips and tricks and more, follow us onFacebook , Twitter andG+.
Thank you , Keep visiting Hackersfall.

How to customize Blogger labels .

How to customize Blogger labels .


 1. Go To Blogger Dashboard>> Select your blog >> Layout >> Add a Gadget >> Labels.
 2. Now Select the title as Labels.
 3. Click on Show >> all labels.
 4. Sort them Alphabetically.
 5. Select Display as cloud.
 6. Uncheck the Show number of post per label.
 7. Click on the SAVE button to save the settings.
 

Now adding style sheet to make it attractive.


1. Go to template editor >> EDIT HTML.
 (Make backup before doing this )

2. Find the following code in your HTML.
]]></b:skin>
3.Now paste the following CSS code just above the code.


.label-size {
float: left;
margin: 0 0 7px 20px;
position: relative;
font-family: 'Helvetica Neue', Helvetica, Arial, sans-serif;
font-size: 0.75em;
font-weight: bold;
text-decoration: none;
color: #996633;
text-shadow: 0px 1px 0px rgba(255,255,255,.4);
padding: 0.417em 0.417em 0.417em 0.917em;
border-top: 1px solid #d99d38;
border-right: 1px solid #d99d38;
border-bottom: 1px solid #d99d38;
-webkit-border-radius: 0 0.25em 0.25em 0;
-moz-border-radius: 0 0.25em 0.25em 0;
border-radius: 0 0.25em 0.25em 0;
background-image: -webkit-linear-gradient(top, rgb(254, 218, 113), rgb(254, 186, 71));
background-image: -moz-linear-gradient(top, rgb(254, 218, 113), rgb(254, 186, 71));
background-image: -o-linear-gradient(top, rgb(254, 218, 113), rgb(254, 186, 71));
background-image: -ms-linear-gradient(top, rgb(254, 218, 113), rgb(254, 186, 71));
background-image: linear-gradient(top, rgb(254, 218, 113), rgb(254, 186, 71));
filter: progid:DXImageTransform.Microsoft.gradient(GradientType=0,StartColorStr='#feda71', EndColorStr='#feba47');
-webkit-box-shadow: inset 0 1px 0 #faeaba,
0 1px 1px rgba(0,0,0,.1);
-moz-box-shadow: inset 0 1px 0 #faeaba,
0 1px 1px rgba(0,0,0,.1);
box-shadow: inset 0 1px 0 #faeaba,
0 1px 1px rgba(0,0,0,.1);
z-index: 1;
}
.label-size:before {
content: '';
width: 1.30em;
height: 1.39em;
background-image: -webkit-linear-gradient(left top, rgb(254, 218, 113), rgb(254, 186, 71));
background-image: -moz-linear-gradient(left top, rgb(254, 218, 113), rgb(254, 186, 71));
background-image: -o-linear-gradient(left top, rgb(254, 218, 113), rgb(254, 186, 71));
background-image: -ms-linear-gradient(left top, rgb(254, 218, 113), rgb(254, 186, 71));
background-image: linear-gradient(left top, rgb(254, 218, 113), rgb(254, 186, 71));
filter: progid:DXImageTransform.Microsoft.gradient(GradientType=1,StartColorStr='#feda71', EndColorStr='#feba47');
position: absolute;
left: -0.69em;
top: .2em;
-webkit-transform: rotate(45deg);
-moz-transform: rotate(45deg);
-o-transform: rotate(45deg);
transform: rotate(45deg);
border-left: 1px solid #d99d38;
border-bottom: 1px solid #d99d38;
-webkit-border-radius: 0 0 0 0.25em;
-moz-border-radius: 0 0 0 0.25em;
border-radius: 0 0 0 0.25em;
z-index: 1;
}
.label-size:after {
content: '';
width: 0.5em;
height: 0.5em;
background: #fff;
-webkit-border-radius: 4.167em;
-moz-border-radius: 4.167em;
border-radius: 4.167em;
border: 1px solid #d99d38;
-webkit-box-shadow: 0 1px 0 #faeaba;
-moz-box-shadow: 0 1px 0 #faeaba;
box-shadow: 0 1px 0 #faeaba;
position: absolute;
top: 0.667em;
left: -0.083em;
z-index: 9999;
}
#Label1 {
height: 210px;
}
.label-size:hover {
background-image: -webkit-linear-gradient(top, rgb(254, 225, 141), rgb(254, 200, 108));
background-image: -moz-linear-gradient(top, rgb(254, 225, 141), rgb(254, 200, 108));
background-image: -o-linear-gradient(top, rgb(254, 225, 141), rgb(254, 200, 108));
background-image: -ms-linear-gradient(top, rgb(254, 225, 141), rgb(254, 200, 108));
background-image: linear-gradient(top, rgb(254, 225, 141), rgb(254, 200, 108));
filter: progid:DXImageTransform.Microsoft.gradient(GradientType=0,StartColorStr='#fee18d', EndColorStr='#fec86c');
border-color: #e1b160;
}
.label-size:hover:before {
background-image: -webkit-linear-gradient(left top, rgb(254, 225, 141), rgb(254, 200, 108));
background-image: -moz-linear-gradient(left top, rgb(254, 225, 141), rgb(254, 200, 108));
background-image: -o-linear-gradient(left top, rgb(254, 225, 141), rgb(254, 200, 108));
background-image: -ms-linear-gradient(left top, rgb(254, 225, 141), rgb(254, 200, 108));
background-image: linear-gradient(left top, rgb(254, 225, 141), rgb(254, 200, 108));
filter: progid:DXImageTransform.Microsoft.gradient(GradientType=1,StartColorStr='#fee18d', EndColorStr='#fec86c');
border-color: #e1b160;
}

Now save template and you're done....!!

Now check your labels. 

How To Add Social Media Share Buttons in Blogger Vertically.

How To Add Social Media Share Buttons in Blogger Vertically.


Social media share buttons  are very important for every blog.Making  social sharing easy is significant part of creating successful blog.Your blog content must be easy to share, so that your audience can easily share on other social sites like Facebook, Twitter and Google+

Adding social media buttons

Adding social media buttons to blogger is as easy as ABC. Today I am going how you can add social sharing buttons widget in your blogger blog vertically. This special widget has following options facebook like, Stumble Upon, Twitter Share, Digg this and Google+. This widget also provides facility to add some other buttons of your choice.

How to add social media sharing buttons in blogger

To add social share buttons in blogger blog you have follow these simple steps.
Step 1  log in to your blogger blog

Step 2:  Go to Layout
Step 3: Click on add Gadget
Step 4: select HTML/JAVA SCRIPT
Step 5 copy the code below and paste there.


<style type="text/css">
#social-buttons {
position:fixed;
bottom:15%
margin-left:-721px;
float:left;
border-radius:5px;
-moz-border-radius:5px;
-webkit-border-radius:5px;
background-color:#fff;
padding:0 0 2px 0;
z-index:10;
}
#social-buttons .button-share {
float:left;
clear:both;
margin:5px 5px 0 2px;
}
</style>
<div id='social-buttons' title="Get this from www.hackersfall.org">
<div class='button-share' id='like' style='margin-left:7px;'>
<div id="fb-root"></div>
<script>(function(d, s, id) {
  var js, fjs = d.getElementsByTagName(s)[0];
  if (d.getElementById(id)) return;
  js = d.createElement(s); js.id = id;
  js.src = "//connect.facebook.net/en_US/all.js#xfbml=1";
  fjs.parentNode.insertBefore(js, fjs);
}(document, 'script', 'facebook-jssdk'));</script>
<div class="fb-like" data-send="false" data-layout="box_count" data-width="40" data-show-faces="false"></div>
</div>
<br /><div class='sbutton' style="margin-left: 2px;" ><a class='twitter-share-button' data-count='vertical' data-via='mybloggingtrack' expr:data-counturl='data:blog.url' href='http://twitter.com/share' rel='nofollow'>Tweet</a><script src='http://platform.twitter.com/widgets.js'; type='text/javascript'></script>
<br />
<div class='button-share' style="margin-left: 3px;" id='su'>
<script src="http://www.stumbleupon.com/hostedbadge.php?s=5"></script>
</div>
<div class='button-share' id='digg' style='margin-left:3px;width:48px'>
<script src='http://widgets.digg.com/buttons.js' type='text/javascript'></script>
<a class="DiggThisButton DiggMedium"></a>
</div>
<div class='button-share' style='margin-left:3px;' id='gplusone'>
<script type="text/javascript" src="https://apis.google.com/js/plusone.js"></script>
<g:plusone size="tall"></g:plusone>
</div>
<div style="clear: both;font-size: 9px;text-align:center;">Get <a style="color: #1F10F7;" href="http://www.hackersfall.org">widget</a></div></div></div>


 step #6 Press the save button.and you are done

To customize the placement of bar : 


To change vertical aligment change 15%
To change horizontal aligment  change 721-
adjust both these according to your template design.
Replace mybloggingtrack  to your own  twitter username.


For more blogging features like this , stay with us. like and follow us on facebook and google .plus.

Powered by Blogger.

Follow Us On Twitter

Contact Form

Name

Email *

Message *


© 2013 HackersFall. All rights resevered. Designed by Templateism

Back To Top